Patent application title: APPARATUS FOR STRAIGHTENING METAL STRIP
Inventors:
Frank-Günter Benner (Hilchenbach, DE)
Roman Dehmel (Grevenbroich, DE)
Rolf Franz (Kreuztal, DE)
Rolf Franz (Kreuztal, DE)
Matthias Kipping (Herdorf, DE)
Peter Jollet (Dusseldorf, DE)
Jens Artel (Kirchhundem, DE)
Assignees:
SMS Siemag Aktiengesellschaft
IPC8 Class: AB21D102FI
USPC Class:
72 84
Class name: Including plural sensors or sensor responsive to comparison between plural conditions sensing work or product (e.g., by x-ray) work and product
Publication date: 2015-01-29
Patent application number: 20150027185
Abstract:
An apparatus for straightening metal strips, including a first, upper
group and a second, lower group of straightening rollers arranged in each
case immediately in succession in a strip running direction, and a group
of individually controllable actuators arranged alongside one another in
a transverse direction. An axial bending profile of at least a first of
the straightening rollers is settable by the group of actuators. At least
one second group of individually controllable actuators arranged
alongside one another in the transverse direction is provided. An axial
bending profile of the least a second of the straightening rollers, which
is in particular different from the bending profile of the first bending
roller, is settable by the second group of actuators.Claims:
1-13. (canceled)
14. An apparatus for straightening metal strips, comprising: a first, upper group and a second, lower group of straightening rolls arranged successively in a strip travel direction; and a group of individually controllable actuators, arranged next to each other in a transverse direction, and at least one second group of individually controllable actuators arranged next to each other in the transverse direction, wherein the group of actuators are operative to adjust an axial bending profile of at least one first straightening roll, and the second group of actuators are operative to adjust an axial bending profile of at least one second straightening roll in a manner different from the bending profile of the first straightening roll.
15. The apparatus according to claim 14, wherein at least three groups of actuators are provided arranged successively in the strip travel direction, each group consisting of at least three actuators, which groups form overall a field of individually controllable actuators by which bending profiles of several straightening rolls arranged successively in the strip travel direction are independently adjustable.
16. The apparatus according to claim. 14, wherein the actuators comprise a hydraulic cylinder.
17. The apparatus according to claim 14, wherein at least one of the groups of actuators is supported on a dimensionally stable crossbeam.
18. The apparatus according to claim 17, further comprising a crossbeam actuator operatively arranged to adjust tilting of the crossbeam around the strip travel direction.
19. The apparatus according to claim 14, further comprising side actuators arranged to subject bearing areas at ends of at least one of the straightening rolls to adjustable loads.
20. The apparatus according to claim 19, wherein the bearing areas at the ends of the at least one of the straightening rolls are subjected to adjustable loads in a direction opposite to the actuators.
21. The apparatus according to claim 14, further comprising a mounting arrangement for a plurality of support rolls, wherein the actuators act on the mounting arrangement and the support rolls transmit force of the actuators to the straightening roll.
22. The apparatus according to claim 21, wherein the mounting arrangement comprises a chain of bearing sections, connected to each other in the axial direction, for the support rolls.
23. The apparatus according to claim 14, further comprising a respective measuring unit arranged both in front of and behind the groups of straightening rolls for measuring flatness defects and/or stresses in the metal strip, wherein the measuring units are used to adjust the straightening rolls during a straightening process.
24. The apparatus according to claim 21, wherein the measuring units are configured to undertake an optical measurement of the form of the metal strip, wherein the metal strip is guided substantially without tension at least in an area of the measuring units.
25. A method for straightening a metal strip using an apparatus according to claim 14, comprising the steps: a. measuring the form and/or stresses of a metal strip with a measuring unit before a first pass through a straightening section; b. adjusting straightening rolls of a straightening section as a function of the measurement of the metal strip; c. straightening the metal strip by passage through the straightening section; and d. measuring the form and/or stresses of the metal strip with a second measuring unit t an exit from the straightening section.
26. The method according to claim 25, including adjusting the straightening rolls with an electronic control unit.
27. The method according to claim 25, including repeating steps b and c as a function of a measurement result in step d.
28. The method according to claim 25, wherein the metal strip passes through the straightening section first in one direction and then, in a following pass, in an opposite direction.
Description:
[0001] The invention pertains to an apparatus for straightening metal
strip according to the introductory clauses of claim 1 and claim 9 and to
a method for straightening metal strip with the features of claim 12.
[0002] U.S. Pat. No. 4,881,392 describes a system for straightening metal strip in which a straightening section is installed downstream from a rolling mill, and in which a measuring device for measuring the flatness of the metal strip is installed downstream, relative to the travel direction, from the straightening section.
[0003] The goal of the invention is to provide an apparatus and a method for straightening metal strips in which the straightening process is effectively optimized.
[0004] For a previously mentioned apparatus according to the introductory clause of claim 1, this goal is achieved according to the invention by the characterizing features of claim 1.
[0005] By means of the at least second group of individually controllable actuators arranged next to each other in the transverse direction, by means of which the axial bending profile of at least one second straightening roll can be adjusted, the action of the straightening rolls on the sheet can be adjusted in an especially well-differentiated manner.
[0006] In a preferred embodiment of the invention, it is provided that at least three groups of actuators arranged successively in the strip travel direction are provided, each group consisting of at least three actuators, which groups form a field of individually controllable actuators, by means which the bending profile of each of several straightening rolls arranged successively in the strip travel direction can be independently adjusted. Such a field of actuators generally makes it possible for the straightening process to achieve a very precise correction of strip defects. If necessary, furthermore, a local correction can be carried out dynamically, especially in relatively short sections of the strip. Such relatively local strip defects can, for example, be detected by a measuring device installed at the entrance to the apparatus.
[0007] In general, it is preferably provided that the actuators comprise a hydraulic cylinder.
[0008] Hydraulic cylinders can be adapted quickly and over a wide range to the requirements on the straightening forces. In an alternative or supplemental elaboration, however, it is also possible to be use thread-controlled, wedge-controlled, or other types of actuators.
[0009] In a preferred embodiment, at least one, preferably several, groups of actuators are supported on a rigid crossbeam. "Rigid" is to be understood within the scope of the invention as meaning that the area moment of inertia of the crossbeam is at least a multiple of the area moment of inertia of the straightening rolls. In a further elaboration, the tilt of the crossbeam around the strip travel direction can be adjusted by means of at least one crossbeam actuator. As a result, the apparatus is given even more possibilities for adjustment. The crossbeam actuators can also be, and preferably are, hydraulic actuators; alternatively or in addition, they can also be wedge-controlled or thread-controlled devices.
[0010] In a generally preferred elaboration, it is provided that the bearing areas at the ends of at least one straightening roll can be subjected to variable load by side actuators, e.g., subjected in particular to load acting in the direction opposite to the actuators. As a result, it is possible, among other things, to adjust the gaps and applied forces easily. The side actuators can preferably be configured as hydraulic cylinders.
[0011] In a simple and generally preferred engineering realization, the actuators can act on a mounting arrangement for a plurality of support rolls, wherein the support rolls transfer the force of the actuators to one of the straightening rolls. In a preferred elaboration, the mounting arrangement comprises a chain of bearing sections for the support rolls, connected to each other in the axial direction. As a result, forces occurring in the axial direction can be absorbed in optimal fashion, so that the action of the individual actuators is locally well defined, and no canting or the like can occur in the area of the actuators or support rolls.
[0012] The goal of the invention is also achieved for an apparatus according to the introductory clause of claim 9 by the characterizing features of claim 9. As a result of the arrangement of a measuring unit before the groups straightening rolls, an especially good measurement can be made, on the basis of which the number of passes through the straightening section can be minimized. In particular, the upstream measurement unit makes it possible to decide whether or not any straightening at all is necessary. In the ideal case, the strip can then completely bypass the straightening section or pass through it without any pressure being exerted on it by the straightening rolls.
[0013] Through the provision of two measuring units, one in front of, the other behind, the straightening rolls, it can be decided in the same pass whether or not a second pass through the straightening section is necessary. From a comparison of the measurements made by the two measuring units, i.e., by the one before the straightening section and the by one after it, it is also possible to derive values for optimizing or changing the settings of the actuators of the straightening section in order to make it possible to optimize the subsequent pass. This can be the second pass or in general the n-th pass.
[0014] In a preferred elaboration, the measuring units comprise the optical, especially the laser-optical measurement of the form of the metal strip, wherein the metal strip, at least in the area of the measuring units, is guided through in a state at least largely free of tension. Largely tension-free guidance is present when the tensile forces caused by the guidance of the strip are kept as small as possible, i.e., so small that they have only a negligible effect on the three-dimensional deformation of the
[0015] In alternative or supplemental elaborations, it is also possible, besides the optical detection of a 3-dimensional deformation, to make provisions for scanning the strip by means of mechanical scanning rollers at a defined tensile stress in order to measure the variable stresses across the width and to use the results as a criterion for adjusting the actuators of the straightening section.
[0016] In general it is advantageous for the apparatus according to claim 9 or claim 10 also to comprise one or more additional features according to one of claims 1-8. It is obvious that, in individual cases, the specific embodiments of such an apparatus can be combined in any way desired with the concept of an apparatus in which a measuring unit is installed both before and after the straightening rolls.
[0017] The goal of the invention is also achieved by a method for straightening metal strip with the features of claim 12. It is especially preferred but not mandatory that an apparatus according to the invention be used for a method according to the invention.
[0018] By using a first, upstream measuring unit to measure the form and/or stresses before a first pass through the straightening section and to use a second measuring unit installed after the straightening section to do the same, the straightening process can be optimized in an especially effective manner, and the number of passes through the straightening section which might be necessary can be minimized. It is obvious that, in addition, data from preceding passes of the same strip and/or from stored models, especially models pertaining to the material to be straightened, data on the strip weights, etc, can also be used.
[0019] In an advantageous elaboration, it is provided that steps b and c are repeated as a function of the measurement result in step d.
[0020] In particular, a second or n-th pass of the strip can occur in the direction opposite that of the preceding pass.
[0021] Additional advantages and features of the invention can be derived from the following exemplary embodiments described below and from the dependent claims.
[0022] In the following, a preferred exemplary embodiment of the invention is described and explained in greater detail on the basis of the attached drawings:
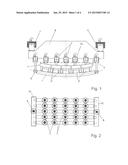
[0023] FIG. 1 shows a schematic diagram of an apparatus according to the invention from the front;
[0024] FIG. 2 shows a schematic diagram of the apparatus of FIG. 1 from above;
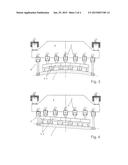
[0025] FIG. 3 shows the apparatus of FIG. 1 in a second state of actuation;
[0026] FIG. 4 shows the apparatus of FIG. 1 in a third state of actuation;
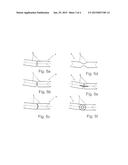
[0027] FIGS. 5a-5f show several modifications of bearing sections of an apparatus of FIG. 1; and
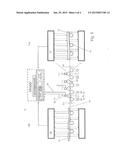
[0028] FIG. 6 shows an overall schematic diagram of an apparatus according to the invention with two measuring units.
[0029] In FIG. 1, only the upper half of the apparatus for straightening metal strip is illustrated, this upper half comprising several straightening rolls 1, arranged successively in the travel direction of the strip (perpendicular to the plane of the drawing in FIG. 1).
[0030] Each straightening roll I is subjected to force by a group of actuators 2, which are arranged next to each other in the transverse, i.e., axial, direction, along the length of the straightening roll 1. Each of the actuators comprises a force-exerting unit in the form of a separately and automatically controllable hydraulic cylinder 2a, which acts on a bearing section 3 of a chain 4 of bearing sections. In an appropriate configuration (not shown), one end of the piston of the actuator 2a can press tiltably on the bearing section, for example. It is obvious that the bending profile of the straightening roll 1 produced by the actuators is exaggerated in FIGS. 1, 3, and 4 for clarity of illustration.
[0031] A pair of support rolls 5 is rotatably supported on each bearing section 3; these support rolls press on the straightening rolls 1 and thus adjust their bending profile as they rotate.
[0032] FIGS. 5a-5f show various alternative configurations of the chain of bearing sections. In the case of the configurations according FIGS. 5a-5c, the bearing sections 3 abut one another, wherein the cooperating end surfaces can be shaped as requirements demand. FIG. 5a shows a simple formation with flat end surfaces. FIG. 5b shows a two convex formations, which have the result of reducing the area subject to friction. FIG. 5c shows a concave end surface, into which an adjacent, convex end surface fits,so that the two bearing sections precisely assume their proper positions relative to each other.
[0033] In the examples according to FIGS. 5d-5f, the adjacent bearing sections are connected to each other in each case, wherein the connecting point provides an increased degree of mobility versus a homogeneous bar. In FIG. 5d, this increased mobility is achieved by the local removal, of material from a solid bar. FIG. 5e shows a connection by means of an elastic connector, which can consist of metal or of some other material, installed between the bearing sections. FIG. 5f shows an arrangement in which the adjacent bearing sections are connected to each other by a joint, e.g., a rotary joint.
[0034] The actuators 2 with their hydraulic cylinders are supported on the side opposite the straightening roll by a nonflexing or dimensionally stable crossbeam 6. The crossbeam is tiltably adjustable by way of crossbeam actuators 7, two such actuators being present here, in order to provide a further adjustment possibility for straightening and/or to allow the crossbeam to be moved aside for maintenance purposes. The crossbeam actuators 7 are also configured as hydraulic cylinders.
[0035] The straightening rolls 7 are mounted at the ends in rotary bearings 8, each of which for its own part is supported on the crossbeam 6 in force-adjustable fashion by way of side actuators 9. In particular, the side actuators 9 can be subjected to force in the direction opposite to the actuators 2 in order to adjust the bending profile of the straightening rolls 7.
[0036] It can be seen in particular from the schematic diagram of FIG. 2 that, in the present case, the bending profile of each of the straightening rolls 1, five in this example, arranged one after the other, can be adjusted substantially individually. For this purpose, a group of actuators 2, arranged axially next to each other, is provided for each straightening roll 1. In the present example, each of the five straightening rolls 1 is adjusted by one group of five actuators in each case, arranged next to each other in the transverse direction, so that, overall, a field of 5×5 separately adjustable actuators 2 is obtained.
[0037] The five straightening rolls 1 are mounted at the ends on beams 10, in which the rotary bearings 8 of the straightening rolls 1 are arranged. Each of the two beams 10 is held by one of the side actuators 9. The beams are advisably guided in such a way that that no tipping in the strip travel direction can occur. Alternatively or in addition, several side actuators 9 can also act on the same beam 10. As another alternative, each individual straightening roll 1 can be mounted at the ends in side actuators 7; or several, e.g., two, straightening rolls can be combined into a unit with respect to their rotational support by their own assigned beams.
[0038] All of the hydraulic cylinders described above have preferably a circular cross section. It is a principle of the present invention that as many standard actuators of the same configuration as possible be used and that no custom configurations such as cylinders with an elongated cross section be needed.
[0039] The upper half of the apparatus described above can be repeated in an essentially symmetric manner as the lower half with a group of lower straightening rolls 1' (see the schematic diagram of FIG. 6). As a result, it is possible, as shown in FIG. 3, to bend the straightening roll in a manner which is the inverse of that shown in FIG. 1, wherein the application of the thrusting forces is accomplished by the actuators (not shown) of the lower half.
[0040] In the case of the positioning according to FIG. 4, the straightening roll is being tilted around the strip travel direction. A tilting of this type can, as shown, be accomplished by the actuators 2, 7 or possibly by the tilting of the crossbeam 6.
[0041] The schematic side view according to FIG. 6 shows an apparatus as described above, to which a first measuring system 11 is assigned in the upstream direction relative to strip travel and a second measuring system 12 in the downstream direction.
[0042] The measuring systems 11, 12 are identical in design and measure irregularities of the largely tension-free metal strip 13 by means of optical systems, especially laser-optic systems.
[0043] FIG. 6 also explains a method in which, according to the invention, the topography or flatness and/or the internal stresses of the metal strip 13 are first determined before the straightening process. For this purpose, the data obtained by the first measuring unit 11 are transmitted over a connection 11a to an electronic control unit or to a model 14 installed in such a unit. For the measurement, the metal strip 13 can rest on rollers 15, for example, as it is being scanned. It is also conceivable that the flatness and/internal stresses of the metal strip could be detected during a pass. For this purpose, a reversing mode would also be possible.
[0044] All of the straightening rolls 1, but at least the upper straightening rolls 1, are preferably equipped with sensors 16 and actuators 17 and are connected by the lines 18 to the model 14. The sensors can measure forces, for example, or moments, positions, inclinations, deformations, etc. The actuators, such as the actuators 2 described above, are able to transmit forces and moments and to change positions by traveling or tilting and thus cause deformations. As a result, the straightening rolls 1 can be brought into as many different positions and deforming states as desired and thus assume any desired positioning relative to each other.
[0045] As a result of the additional measuring unit 12 downstream from the straightening rolls, the metal strip 13 could be measured again, at least as an option. The resulting data are made available to the model 14 over a connecting line 12a.
[0046] The model 14 is described in one or more computers and consists of additionally implemented submodels. These are materials models for the materials to be straightened, models for describing the straightening process, mechanical models for describing machine components and their interaction during straightening, models for processing the sensor signals, models for processing and working up the geometry (flatness/planarity defects) and internal stresses of the material 13 to be straightened, models for correcting flatness defects, models for controlling the actuators of the straightening machine, etc.
[0047] All of the data and signals are tied into corresponding models, feedback control circuits, and algorithms. Integration and processing take place in a higher-level technological model.
[0048] This model could, for example, decide, either independently or with operator support, whether or not the metal strip 13 should be straightened again or whether it can be released for further processing. The local penetration depth E1 into the plane P_1 up to the penetration depth En in plane P_n can be set by the model 14 as necessary to meet the requirements on the end product. The "local penetration depth" is to be understood not only as the parallel straightening gap RS but also as a non-constant straightening gap RS, which can arise through the tilting and bending of at least one of the straightening rolls 1. The straightening machine can be operated with the help of the model 14 in such a way that it can change the penetration depths and the straightening gaps either statically or dynamically (during the straightening process). It is also conceivable that the support width a could be adjusted by moving the straightening rolls 1, such movement being controlled in open-loop or closed-loop fashion by the model 14.
[0049] The normal or first-pass direction of the metal strip 13 is from right to left as shown in FIG. 6. The plane 19 can be used as a reference plane for the measuring units and for the penetration depth. A second pass, if performed, can take place in particular from left to right, especially in the case of a tandem measuring system.
[0050] By means of the method described above, it is possible to describe the actual state of the metal strip in terms of its flatness and/or its internal stresses and to make the acquired data available to a model, which is described in a computer. The model is then able to control and automate the straightening process. The result of the straightening can be determined by means of a second measurement in a second measuring unit 11, 12. The data can be used by the model to adapt and optimize itself independently The straightening process can be fully or partially automated, optimized, and logged.
User Contributions:
Comment about this patent or add new information about this topic:

