Patent application title: Assembly Comprising a Measuring Scale Attached to a Substrate and Method for Holding a Measuring Scale Against a Substrate
Inventors:
Peter Speckbacher (Kirchweidach, DE)
Josef Weidmann (Altenmarkt, DE)
Wolfgang Holzapfel (Obing, DE)
Wolfgang Holzapfel (Obing, DE)
IPC8 Class: AG01D5347FI
USPC Class:
33707
Class name: Distance measuring scale reading position sensor (e.g., grid counting) optical
Publication date: 2012-02-02
Patent application number: 20120023769
Abstract:
An assembly including a substrate and a scale held on the substrate,
wherein the scale has a measuring graduation, and the scale is held on
the substrate by pneumatic suction. The scale is braced on the substrate
via two-dimensionally distributed, spaced-apart supports, which are
disposed facing a measurement area defined by the measuring graduation
and wherein adjacent ones of the supports are spaced apart from one
another at a mutual period that is less than a thickness of the scale. In
addition, the supports have a structure such that a connection by optical
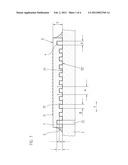
contact bonding between the supports and the scale and/or between the
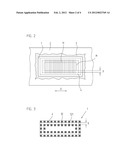
supports and the substrate is prevented at least in the measurement area.
A space between the scale and the substrate is sealed off from
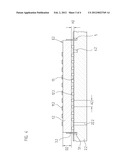
surroundings by a sealing structure.Claims:
1-13. (canceled)
14. An assembly comprising: a substrate; a scale held on said substrate, wherein said scale comprises a measuring graduation, and said scale is held on said substrate by pneumatic suction, wherein said scale is braced on said substrate via two-dimensionally distributed, spaced-apart supports, which are disposed facing a measurement area defined by said measuring graduation and wherein adjacent ones of said supports are spaced apart from one another at a mutual period that is less than a thickness of said scale; wherein said supports have a structure such that a connection by optical contact bonding between said supports and said scale and/or between said supports and said substrate is prevented at least in said measurement area; and wherein a space between said scale and said substrate is sealed off from surroundings by a sealing structure.
15. The assembly as defined by claim 14, wherein surface regions contacting one another between said supports and said scale and/or between said supports and said substrate have such great roughness that said roughness prevents a connection by optical contact bonding between said surface regions.
16. The assembly as defined by claim 14, wherein said supports contact said scale and/or said substrate in point-like form, so that a connection by optical contact bonding is prevented.
17. The assembly as defined by claim 14, wherein said supports are disposed and embodied such that they form mutual free spaces with a height of at least 20 μm and a mutual peripheral spacing of at least 20 μm.
18. The assembly as defined by claim 14, wherein said substrate is made of a material that coefficient of thermal expansion that is identical to a coefficient of thermal expansion of a material of said scale.
19. The assembly as defined by claim 18, wherein said coefficient of thermal expansion of said substrate is less than 1.5.times.10.sup.-6K.sup.-1.
20. The assembly as defined by claim 18, wherein said coefficient of thermal expansion of said substrate is less than 0.1.times.10.sup.-6K.sup.-1.
21. The assembly as defined by claim 14, wherein said pneumatic suction is effected via at least one suction conduit, which is disposed outside said measurement area.
22. The assembly as defined by claim 14, wherein protrusions in a two-dimensional grid, which form said supports, are embodied integrally on said scale or said substrate.
23. The assembly as defined by claim 14, wherein said supports are spacer elements which are embodied in a structured intermediate layer.
24. The assembly as defined by claim 14, wherein said supports are balls.
25. The assembly as defined by claim 24, wherein said balls are held immovably in their positions via a holding structure.
26. The assembly as defined by claim 25, wherein said holding structure comprises a layer disposed on the substrate or said scale, in which said balls are embedded, and a thickness of said layer is a fraction of a diameter of said balls.
27. A method for holding a scale on a substrate during the scanning of a measuring graduation of said scale for position measurement, wherein said holding during said position measurement is effected by pneumatic suction of said scale against said substrate, said method comprising: supporting a scale on a substrate by disposing two-dimensionally distributed supports on said scale or said substrate, wherein said supports are disposed facing a measuring graduation of said scale and said supports have a mutual period that is less than a thickness of said scale; forming a connection by optical contact bonding between said supports and said scale and/or between said supports and said substrate is prevented at least in a measurement area of said scale; generating a holding force, via pneumatic suction, that acts in a space between said scale and said substrate; and sealing off said space from surroundings by a sealing structure.
Description:
[0001] For measuring the relative position of two machine parts, a scale
has to be secured to one of the machine parts, and a scanning unit has to
be secured to the other of the machine parts movable relative to one
another. In the position measurement, a measuring graduation of the scale
is scanned by the scanning unit, and position-dependent scanning signals
are generated.
[0002] One possible way of securing a scale on a substrate is described in East German Patent Disclosure DD 229 334 A1. In it, the scale is forced against the substrate by way of pneumatic suction. For the suction, a suction conduit is provided outside the measuring graduation and is intended to force the scale, over its entire length, against the substrate with a constant contact pressure.
[0003] The problem here is that when the scale rests on the substrate, the connection can easily be interfered with by contaminants or the development of air bubbles in the space between the scale and the substrate. These problems lead to changes in length over time and location of the measuring graduation of the scale, which in turn cause errors in the position measurement. This problem occurs to an increased degree in relatively large-area scales.
[0004] In European Patent Disclosure EP 1 783 463 A1, a scale fastening by means of optical contact bonding elements is explained. In large-area optical contact bonding elements, the problem is that a disturbance in the contact face can detach the entire optical contact bonding element, because the detachment spreads. To prevent this large-area detachment of the optical contact bonding connection, the contact face of EP 1 783 463 A1 is subdivided into many small contact faces spaced apart from one another. Although this embodiment does ensure a secure fastening of the scale to a substrate, nevertheless a stress-free contact pressure that is homogeneous over the entire measuring graduation plane is only poorly attained in this way.
[0005] In EP 1 783 463 A1, it is pointed out that the optical contact bonding element can be initiated by pneumatic suction of the scale against the substrate. Holding the scale on the substrate by pneumatic suction in the measurement mode of the position measuring instrument is not mentioned. Nor are any structural provisions for the pneumatic suction mentioned.
[0006] It is the object of the invention to disclose an assembly with a scale secured to a substrate, in which the scale is held on the substrate stably in terms of changes in length. Moreover, the scale should be held on the substrate at every point with the most constant possible contact pressure and in a manner free of drifting.
[0007] This object is attained by the assembly recited in claim 1.
[0008] The scale is braced on the substrate via two-dimensionally distributed supports that are spaced apart from one another. The supports are located directly opposite the measuring graduation that defines a measurement area, and they are disposed at a mutual distance that is less than the thickness of the scale. The supports are also embodied such that a connection by optical contact bonding between the supports and the scale and/or between the supports and the substrate is prevented at least in the measurement area of the scale. For creating a homogeneous underpressure in the space between the scale and the substrate, this scale is sealed off hermetically from the surroundings by sealing means.
[0009] The connection by optical contact bonding elements can be prevented by various provisions.
[0010] One of these provisions is that the surface regions contacting one another between the supports and the scale and/or between the supports and the substrate have such great roughness that the roughness prevents a connection by optical contact bonding between the surface regions. These surface regions can also have coatings that prevent optical contact bonding, in particular metal coatings or coatings that act hydrophobically.
[0011] A further provision for preventing optical contact bonding is the embodiment of the supports of the scales such that they contact the counterpart face only in point-like fashion.
[0012] A further object of the invention is to disclose a method for holding a scale on a substrate, by which method the scale is held stably on the substrate with respect to changes in length, with the most constant possible contact pressure at every point and without drifting.
[0013] This object is attained by the method recited in claim 13.
[0014] Further advantageous features of the invention are recited in the dependent claims.
[0015] By means of the invention, the attainable advantages of pneumatic suction are exploited in that the most homogeneous possible surface forces are exerted as holding forces, yet at the same time the disadvantages of large-area contact are avoided because many supports separate from one another are provided.
[0016] The surface smoothness--even of a large-area scale--is preserved or is not interfered with, since interfering media can be deposited in the spaces formed by the spaced-apart supports. By means of the provision according to the invention, short-period errors in length in the plane of the measuring graduation are avoided, and high measurement accuracy is ensured.
[0017] In the measurement mode, the scale is secured stably on the substrate, which means great rigidity in the measurement direction and also perpendicular to the plane of the measuring graduation.
[0018] By means of the invention, in contrast to optical contact bonding, it is ensured that the holding forces generated by the pneumatic suction develop uniformly over the entire surface of the scale. This is achieved by providing that an optical contact bonding element at the contact faces between the scale and the substrate is avoided. Thus there is also the advantage that the contact faces do not have to be machined with high precision; polished surfaces are sufficient.
[0019] Exemplary embodiments of the invention will be described in further detail in conjunction with the drawings.
[0020] In the drawings:
[0021] FIG. 1 shows a scale held on a substrate in accordance with a first exemplary embodiment in cross section;
[0022] FIG. 2 is a plan view on the assembly of FIG. 1;
[0023] FIG. 3 is a view of the scale from below in the assembly of FIG. 1;
[0024] FIG. 4 is a cross section through a substrate with a scale secured to it in a second example; and
[0025] FIG. 5 is a plan view on the assembly of FIG. 4.
[0026] A first exemplary embodiment of the invention will be explained in conjunction with FIGS. 1 through 3. In it, a scale 1 of glass or glass ceramic (such as ZERODUR) with a measuring graduation 11 is shown. The measuring graduation 11 is an incremental graduation, which is scanned in the position measurement in the measurement direction X by a scanning unit, not shown, for generating position-dependent scanning signals. The measuring graduation 11 can be a reflective amplitude grating or a phase grating, which serves in a known manner to provide high-precision interferential position measurement. During this position measurement, the scale 1 is held on a substrate 2 by pneumatic suction. Pneumatic suction means clamping by a vacuum, also known as vacuum clamping. This substrate 2 preferably comprises a material which has the same thermal expansion as the scale 1. The mean coefficient of thermal expansion a in the temperature range from 0° to 50° of the scale 1 and substrate 2 is preferably less than 0.1×10⁻⁶K-1 when glasses with so-called zero expansion are used, such as ZERODUR, SITAL and ULE, and less than 1.5×10⁻⁶K-1 when metals are used, such as INVAR.
[0027] Raised areas 12 are embodied on the surface of the scale 1 toward the substrate 2. These raised areas 12 are spatially distributed two-dimensionally, either distributed geometrically uniformly in a regular grid or distributed statistically. The raised areas 12 are disposed with a mutual period A of less than the thickness D of the scale 1. In particular, the raised areas 12 are disposed at a mutual period A of less than 1/10 the thickness D of the scale 1. These conditions must be met at every point of the two-dimensional distribution of the raised areas 12, but at least inside the measurement area M. The measurement area M is defined by the area of the measuring graduation 11 that is used for the high-precision position measurement. The thickness D of the scale 1 is the spacing between the measuring graduation plane E, in which the measuring graduation 11 is located, and the contact face 21 of the substrate 2.
[0028] By means of this provision, it is ensured that all the tensile and compressive stresses that are introduced by the fastening are spatially so high-frequency that they degrade over the thickness D of the scale 1 and do not act as length errors in the measuring graduation plane E. Because of the support directly facing the measuring graduation 11, in the measurement mode the scale 1 is secured stably on the substrate 2, which means high rigidity in the measurement direction X as well as perpendicular to the measuring graduation plane E.
[0029] The height H of the raised areas 12 is advantageously greater than 20 μm; favorable values are in particular 50 μm to 200 μm. Typical values for the thickness D of the scale 1 are in the range from 1 to 15 mm. The raised areas 12 form two-dimensionally distributed, spaced-apart supports for the scale 1.
[0030] The surfaces 121, contacting the substrate 2, of the raised areas 12 of the scale 1 and/or the contact face 21 of the substrate 2 that contacts the raised areas 12 have such great roughness that the roughness prevents a connection by optical contact bonding between these surface regions 121, 21. In particular, the roughness of at least one of these surfaces 121, 21 contacting one another is greater than 1 nm.
[0031] The two-dimensional spatial distribution of the raised areas 12 shown in FIG. 3 as a view on the scale from below is effected in such a way that between the raised areas 12, opening conduits are created that extend as far as the suction conduit 4. By this provision, the air can be aspirated by suction homogeneously over the entire surface area of the scale 1 via the opening conduits, which ensures good smoothness of the scale 1, and the holding force generated by the pneumatic suction can act uniformly over the entire surface area, so that the scale 1 is forced at every point against the contact face 21 of the substrate 2 with at least an approximately equal force. The raised areas 12 can have a square shape, as shown schematically in FIG. 3, but they can also have other shapes, such as a cylindrical shape.
[0032] It has been found that a majority of the particles, which are located in the space between the scale 1 and the substrate 2 and which would interfere with the smoothness of the scale 1, have a size up to 20 μm. For this reason, it is advantageous if the opening conduits have a width B of at least 20 μm; that is, the mutual peripheral spacing of the contact faces 121 of the raised areas 12 amounts to at least 20 μm. To generate sufficient holding forces, the linear extent of the contact faces 121 of the raised areas 12 should be markedly less than the period A.
[0033] The space between the scale 1 and the substrate 2 is sealed off from the surroundings by sealing means 3. The sealing means 3 are designed and disposed in such a way that no unstable interfering forces are exerted by them, and in particular, shear forces should be avoided.
[0034] In the first example shown, the sealing means 3 is a sealing composition. High-viscosity liquids, silicones, kneading compositions, epoxy resins, adhesives, or adhesive strips can be used as the sealing composition. If liquids are used as the sealing means, they should have a viscosity higher than 100 Ns/m2.
[0035] Instead of the sealing composition, a sealing lip, for instance of a plastic such as Teflon or Perburan, can be used.
[0036] The sealing means can also be a solid rib extending all the way around, embodied or mounted on the scale 1 and/or on the substrate 2, or mounted as a separate part in the form of an intermediate element. If the sealing means is embodied on the substrate 2 and/or on the scale 1, then it is advantageously made by the same production process as the raised areas 12. The sealing means 3 can also engage a groove in the scale 1 and/or the substrate 2.
[0037] The pneumatic suction is effected via an opening 22, which leads to the suction conduit 4. The suction conduit 4 is disposed outside the measuring graduation 1, surrounding the measurement area M, and in particular extending all the way around. "Outside the measurement area M" means outside the region of the measuring graduation 1 used for the high-precision position measurement. The suction conduit 4 is furthermore disposed inside the space, sealed off by means of the sealing means 3, in the scale 1 and/or in the substrate 2. If there is adequate sealing off of the space between the scale 1 and the substrate 2 and a sufficiently large cross section of the suction conduit 4, no interfering pressure drop occurs in the suction conduit 4 even if there are small leaks in the sealing means 3. It is thereby ensured that even in the space between the scale 1 and the substrate 2, a homogeneous underpressure develops. It is therefore on the one hand advantageous that the cross section of the suction conduit 4 is considerably greater than the maximum leak that occurs during operation. As a result, a pressure drop in the space between the scale 1 and the substrate 2 is avoided. On the other hand, it is advantageous that the suction conduit 4 is spaced apart from the measurement area M, and this spacing F should be greater than the thickness D of the scale 1. As a result, problems that are nevertheless introduced through the suction conduit 4 are degraded across the lateral spacing F and do not reach the measuring graduation plane E. Preferably the width K of the suction conduit 4 is narrow compared to the thickness D of the scale 1, so that at most, only spatially high-frequency stresses are created, which in turn are well-suppressed across the thickness D of the scale 1 toward the measuring graduation plane E. To achieve the requisite large cross-section of the suction conduit 4, this conduit must be embodied with a suitable depth T.
[0038] It is advantageous if supports, for instance in the form of the raised areas 12, are also disposed outside the suction conduit 4, as schematically shown in FIG. 3. As a result, bending stresses at the edges of the scale 1 are avoided.
[0039] The final pressure thus generated in the sealed-off space is typically in the range from 100 to 800 mbar, and the change in the pressure over time is less than 2 mbar.
[0040] In the example described above, the spaced-apart raised areas 12 are embodied in the form of bumps that are integral with the scale 1. They are preferably made by known structuring methods, by covering the regions with the raised areas 12 and etching away the material around the raised areas 12.
[0041] Raised areas can alternatively or in addition be embodied on the substrate 2 as well.
[0042] The raised areas 12, embodied on the scale 1 or on the substrate 2, can also be created by other erosive methods, such as sawing, milling, jet machining or laser machining.
[0043] The supports can also be found by independent stable spacer elements which are placed between the scale and the substrate. The spacer elements can comprise a structured layer applied to the scale or to the substrate. They can also be embodied as an independently manipulatable part, especially in the form of a structured intermediate layer or intermediate plate, which can be a perforated metal foil.
[0044] It is especially advantageous to use supports that contact the scale in point-like fashion, in order thereby to securely avoid a partial optical contact bonding.
[0045] It is advantageous to use balls 12.2 as supports for the scale 1.2, as is schematically shown in the second exemplary embodiment in FIGS. 4 and 5. At least in the completely installed state of the scale 1.2 on the substrate 2.2, the balls 12.2 are immovably held in their position on the substrate 2.2 via holding means 13. "Immovably" means on the one hand that their position relative to the substrate 2.2 is invariable, and on the other that they are not rotatable.
[0046] In particular, the balls 12.2 have a diameter H2 of between 20 μm and 200 μm, and they advantageously comprise a material which has the same thermal expansion as the scale 1.2. For holding the balls 12.2 on the scale 1.2 or on the substrate 2.2 without drifting, the holding means 13 is advantageously employed in the form of a layer in which the balls 12.2 are bound locally stably. This layer is for instance photoresist, polymer, or a foil and has a thickness which is a fraction of the diameter H2 of the balls 12.2, typically being from 0.2 to 2 μm.
[0047] In FIG. 5, the two-dimensional measuring graduation 11.2 of the scale 1.2 is shown in plan view. For better illustration of the two-dimensionally distributed arrangement of the balls 12.2 between the scale 1.2 and the substrate 2.2, the scale 1.2 has been left out in one part of the view.
[0048] To achieve the requisite sealing off of the space between the scale 1.2 and the substrate 2.2, a sealing lip 3.2 in foil form is used in this example. The sealing lip 3.2 is on the one hand secured to the scale 1.2, and on the other, it engages a groove 5 of the substrate 2.2. This sealing lip 3.2 engages the groove 5 of the substrate 2.2 in such a way that the inward-pointing surface of the sealing lip 3.2 presses against an inner boundary face 51 of the groove 5. This boundary face 51 is aligned with the shape of the sealing lip 3.2, and this shape is oriented perpendicular to the measuring graduation plane E2. Inside the sealed-off space, once again there is a suction conduit 4.2, which is dimensioned as in the first exemplary embodiment. Both functionally identical elements and size indications are identified in the drawings of the second exemplary embodiment by the same reference numeral as in the first exemplary embodiment, but with "0.2" appended.
User Contributions:
Comment about this patent or add new information about this topic:

